
Many people don’t realize, but configuring DNS addresses can significantly improve your internet connection’s reliability and speed. Here’s a quick guide to setting up DNS addresses, using Cloudflare public DNS as an example, but you can choose any provider, like Google.
Method 1: Using Control Panel
- Save any existing DNS addresses you might have set up, just in case you need them later.
- Open Control Panel by searching for it in the search bar.
- Navigate to Network and Internet, then to Network and Sharing Center.
- Click on Change Adapter Settings.
- Right-click on your internet connection (Ethernet or Wi-Fi) and select Properties.
- Double-click Internet Protocol Version 4 (IPv4) or Internet Protocol Version 6 (IPv6) if supported by your network.
- Choose Use the following DNS server addresses.
- For IPv4, enter 1.1.1.1 as the Preferred DNS server and 1.0.0.1 as the Alternative DNS server. For IPv6, choose preferred addresses accordingly.
- Click OK.
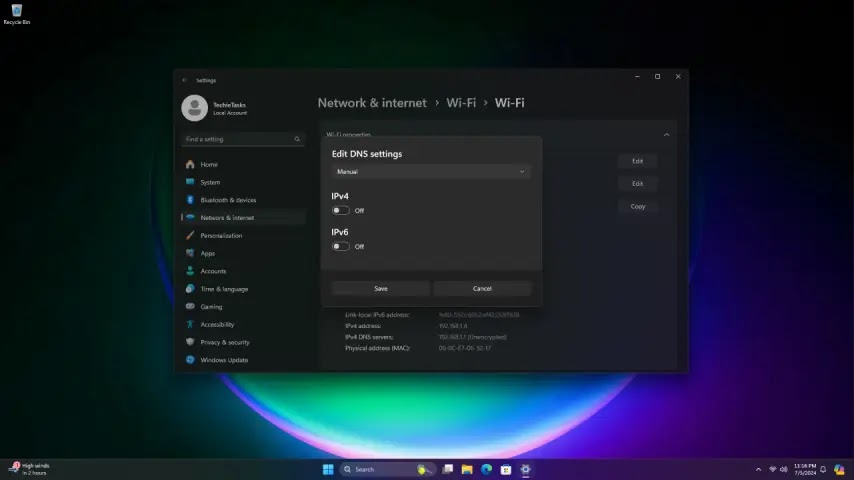
Method 2: Using Windows Settings
- Press Windows Key + I to open Settings, or right-click the Start menu and select Settings.
- Go to Network and Internet.
- Select your internet connection (Ethernet or Wi-Fi). For Wi-Fi, first click Hardware Properties.
- Navigate to DNS Server Assignment and click Edit.
- Set it to Manual and toggle the IPv4 or IPv6 switch, if supported.
- Enter the Preferred and Alternative DNS addresses, such as 1.1.1.1 from Cloudflare and 8.8.8.8 from Google.
- Click Save.
Remember, you can always revert to your previous settings if you encounter any issues. Configuring DNS settings can be a quick way to improve your connection stability and speed.
Tags
Windows