Switching from UEFI boot to Legacy boot involves changing the disk partition style from GPT to MBR. Here's a detailed guide on how to do it, along with configuring your BIOS settings.
Step 1: Understanding the Basics
UEFI boot requires a GPT disk, while Legacy boot requires an MBR disk. Therefore, when switching from UEFI to Legacy, it's essential to convert your disk from GPT to MBR.
For more details, refer to our articles:
- How To Convert GPT to MBR.
- How To Convert GPT to MBR During Windows Installation.
- How To Convert GPT to MBR Without Losing Data.
Step 2: Enabling Legacy or CSM Mode
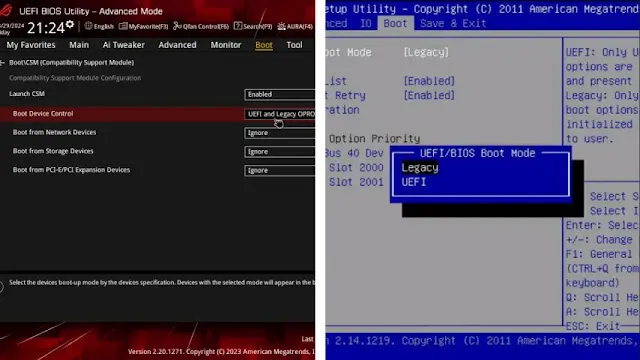
The steps to enable Legacy or CSM (Compatibility Support Module) mode can vary depending on the computer. In this example, I'll demonstrate using an Asus ROG Strix Motherboard, but the process should be similar on other devices.
- Restart Your Computer: Begin by restarting your computer and entering the BIOS setup.
- Entering BIOS/UEFI Setup: If you're unsure which key to press to enter the BIOS or UEFI Setup menu, our article on "How To Enter BIOS or UEFI by Manufacturer" can help.
- Switch to Advanced Mode: In the BIOS/UEFI Setup menu, if you're in easy mode, switch to advanced mode. On an Asus ROG Strix Motherboard, press F7.
Configure Boot Mode:
- Navigate to the Boot tab.
- Look for boot mode or Compatibility Support Module (CSM).
- Ensure that Boot mode is set to Legacy or CSM is enabled.
If you have a newer motherboard, you may be able to enable CSM and choose the boot device control to be Legacy only, UEFI only, or both.
Save Changes and Exit:
- Navigate to the Exit tab.
- Click "Save Changes and Reset" or press F10 to save the changes and restart your computer.
Following these steps will help you successfully switch from UEFI boot to Legacy boot, ensuring your system is set up correctly for Legacy mode.

